Sail Boat Parts
For the Downloadable PDF Version: Click HERE
-
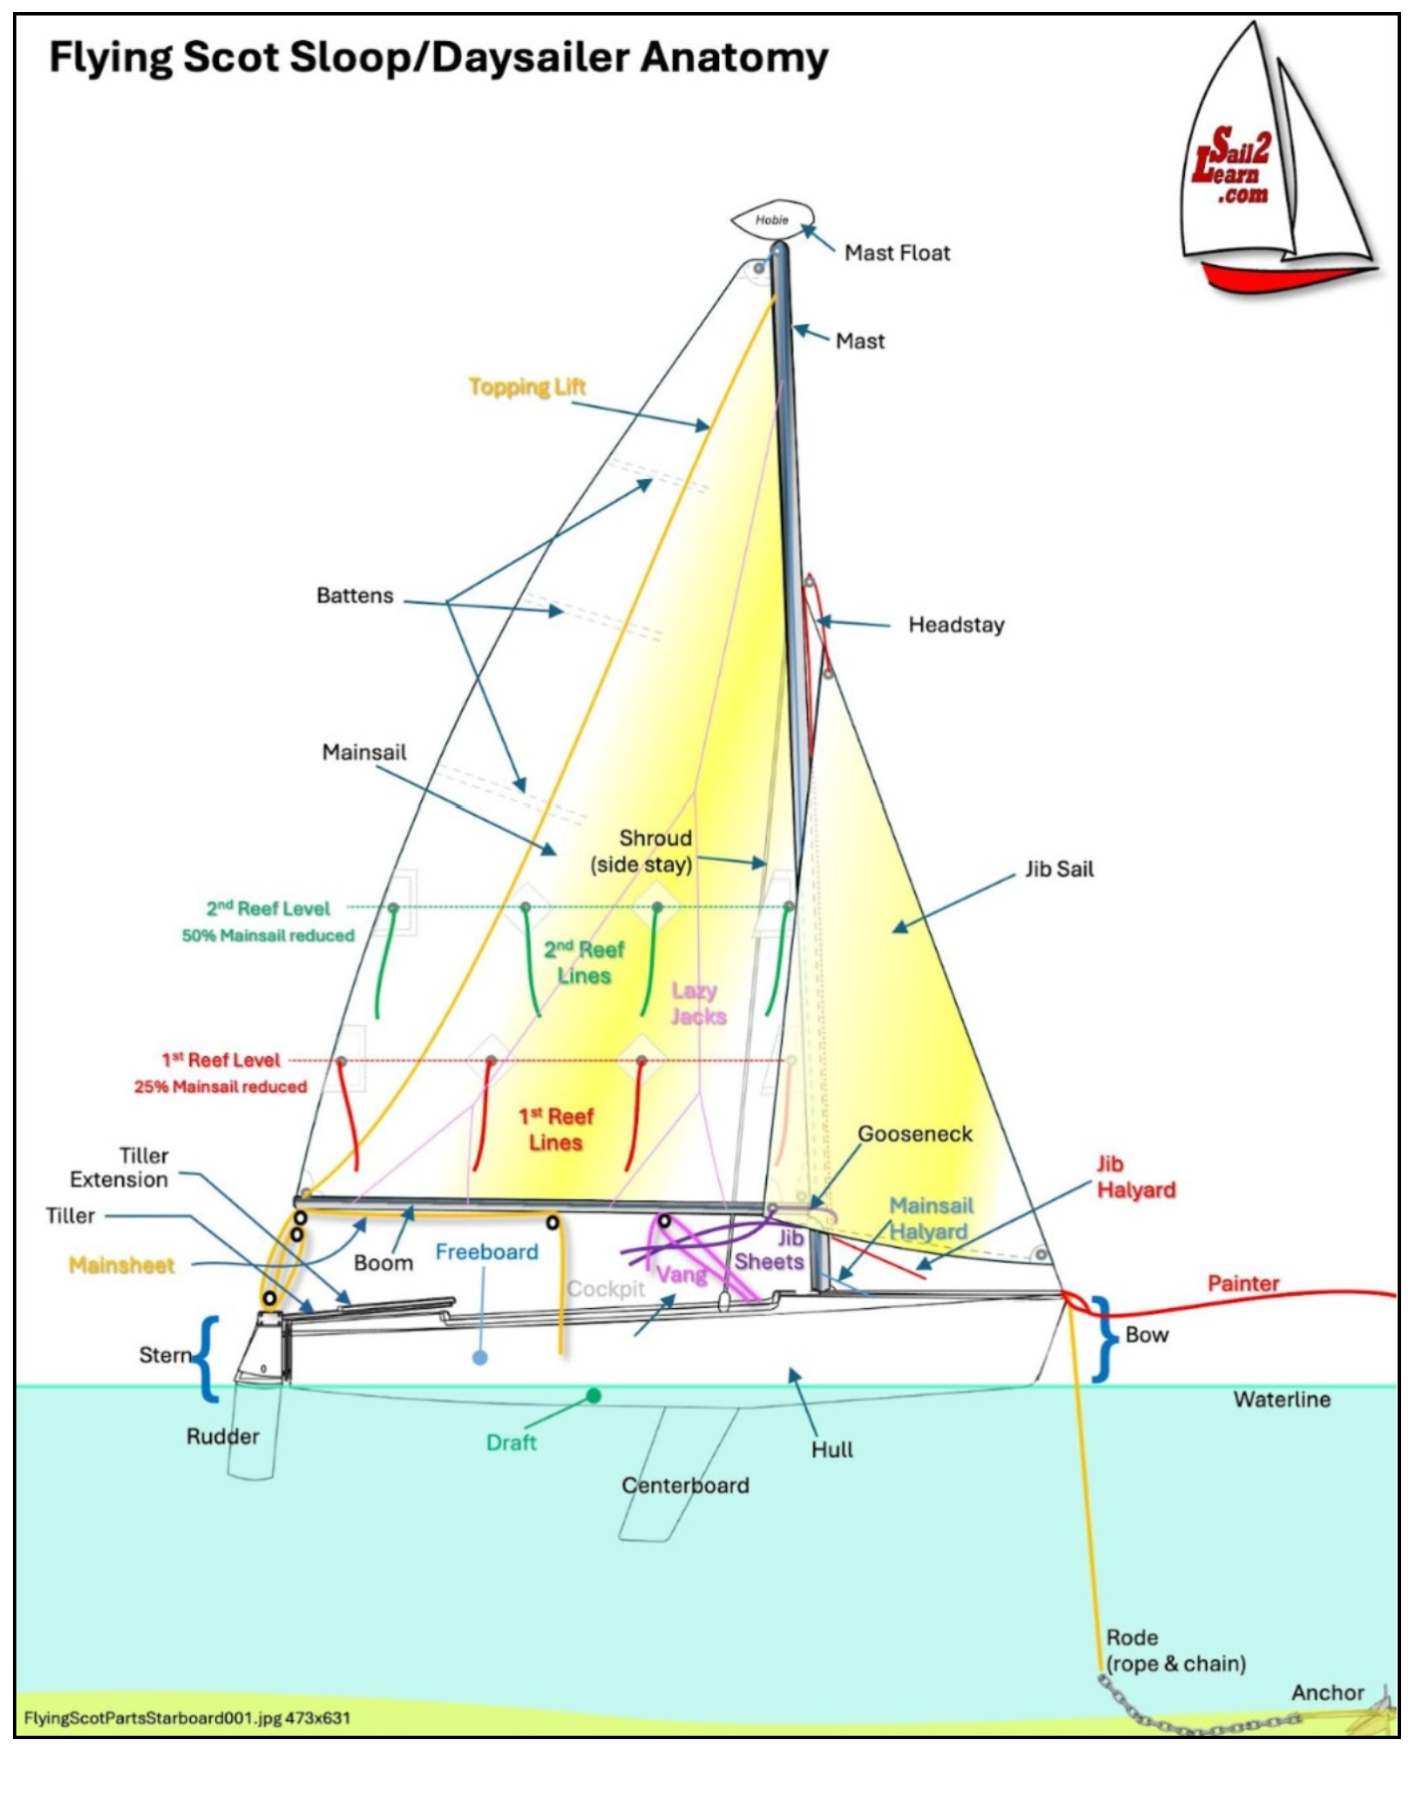
The mainsail first reef REEFING LINES (This shows four red lines attached to reinforced grommets in the lower quarter of the mainsail). Reefing points typically have reinforced patches (up to four layers of sailcloth) with brass grommets punched thru them. These lines are used to secure the lower 25% of the sail to the boom when reducing the amount of sail exposed to the wind.
If you see a storm approaching, you should REEF the mainsail. To put in a reef you turn into the wind and uncleat the mainsails halyard, lower the mainsail until the desired reefing lines are even with the boom, secure the aft (new clew) reefing line, secure the forward reefing line (new tack), and tie the central reefing lines around the boom. Then - haul, sweat, and cleat the mainsail halyard again. The two central reefing lines are secured using a reefing (square) knot.
-
The mainsail second reef REEFING LINES (This shows four green lines attached to reinforced grommets in the lower half of the mainsail). These lines are used to secure the lower 50% of the sail to the boom when reducing the amount of sail exposed to the wind.
If you see a storm approaching you should REEF the mainsail. To put in a reef you turn into the wind and uncleat the mainsails halyard, lower the mainsail until the desired reefing lines are even with the boom. Then first, secure the aft (new clew) reefing line, secure the forward reefing line (new tack), and then tie the central reefing lines around the boom. The two central reefing lines are secured using a reefing (square) knot. Then - haul, sweat and cleat the mainsail halyard again. Once the winds diminish you can shake out a reef (or two) to increase mainsail area.
-
The ANCHOR can be gradually lowered and set to keep your vessel somewhat stationary - tho know that it will potentially swing up to 360 degrees around the anchor in the current and or wind. AND it is important to plan for rising or falling tides! Always check the tides before setting off. AND beware that tides differ DRAMATICALLY from place to place. For instance in the Sarasota area the difference between high and lows tides is rarely over three feet. In Savannah, GA the difference is usually about eight feet. In Maine 20-30 feet is common!!!
Be wary of obstructions like channel markers, pilings, shoals, seawalls and other vessels at anchor! You should use the proper anchor (for the type of seabed; sand, mud, shells, grass, rocks) and the proper range (length of your anchor rode (chain+rope)) based on; {the deepest depth (as tide changes during your anchoring period) of the water where you drop anchor + your freeboard} x 5.
In this instance we have anchored in water that is presently 7 feet deep... and the incoming tide will rise another 2 feet over the next six hours (7+2 = 9 feet). A Flying Scot freeboard is 3 feet (9 + 3 = 12 feet). So we need to gradually lower the anchor and slowly (as the wind and current push us away downwind) ease out a minimum of (12 x 5 = 60 feet of rode. On JoySEA TOO the anchor is secured to the foredeck and fed thru a bow roller.
-
The BATTENS are lightweight semi-flexible structures that fit inside pockets in the sail. Their function is to extend the sail surface to present more area to the wind.
-
The BOOM is a spar that stretches the clew of the sail aft away from the mast and stretches the foot of the mainsail downward away from the head of the mainsail. The boom is connected to the centerline of the boat via the mainsheet.
-
The BOOM VANG or VANG (shown in hot pink here) is like the mainsheet a pair of double-pulleys that can be hauled on to prevent the boom from rising vertically. This is a part of the running rigging. This line is essential when on a broad reach or a run - *especially* when winds are variable in direction. A wildly wagging boom during a run can yank your boom free of the mast. Sometimes even breaking a shroud/side stay and bring the mast down. A definite No-No!
-
The BOW is the pointy end of the boat. The centerline runs from the bow to the rudder and splits the boat into left and right (or port and starboard) sides.
-
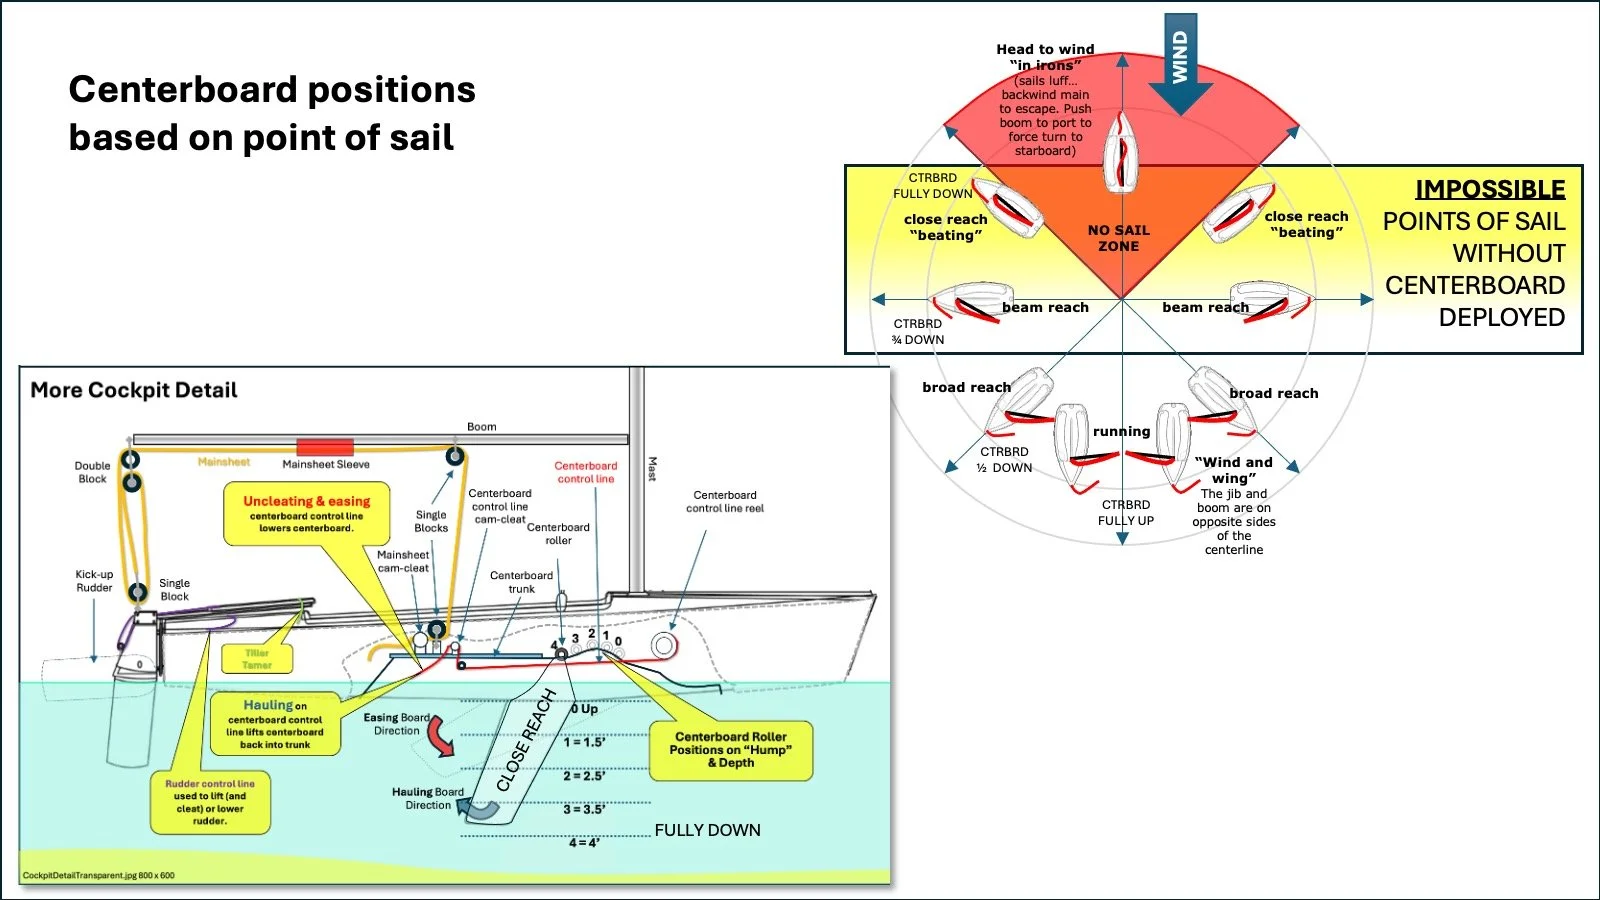
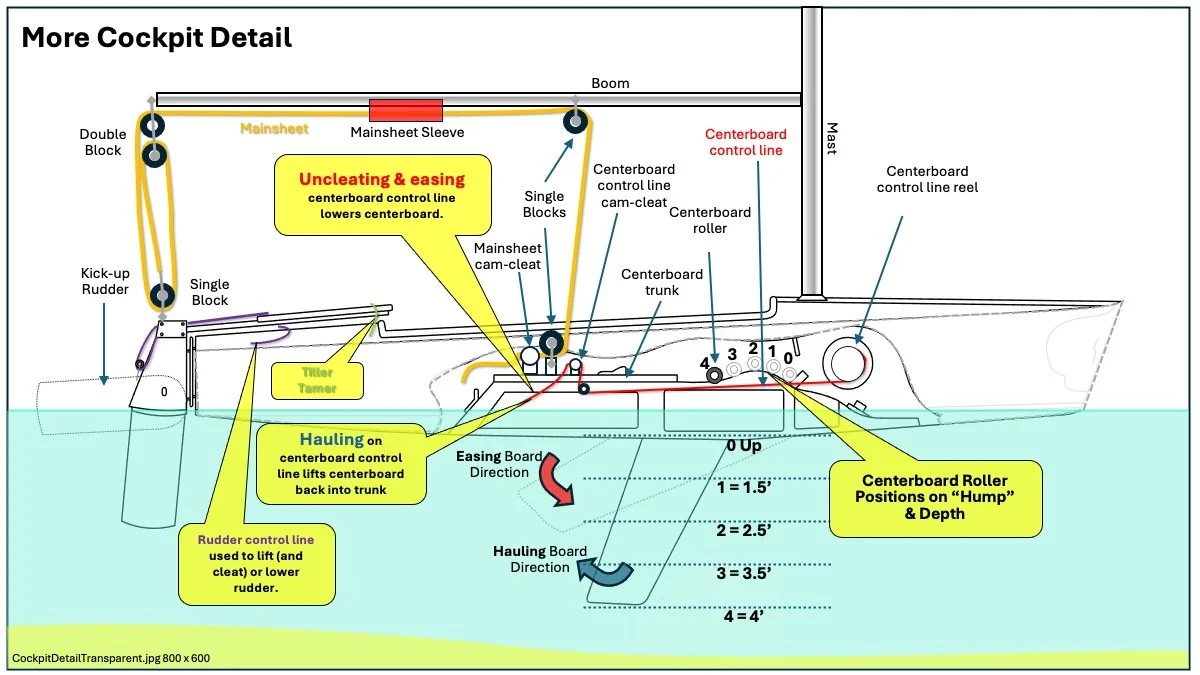
The CENTERBOARD (swing keel) on the Flying Scot is of a rotational or swing design. When the centerboard is pulled up the draft or depth below the waterline is 8 inches. When the centerboard is fully down - draft is 48 inches. The centerboard has a plywood core and is sheathed in layers of fiberglass and resin. It contains a lead plate near the bottom. The centerboard weighs approximately 120 pounds. The function of the centerboard is to prevent sideslip/leeway where the boat is pushed downwind when sailing a beam reach or especially a close reach. There is additional information on the centerboard when you click on COCKPIT INTERIOR.
-
The COCKPIT is the interior of the hull where the helmsman and crew sit. The tiller, mainsheet and most control lines can be accessed from the cockpit.
-
The DRAFT is the portion of the hull below the waterline. The draft is also expressed as a distance measurement... as in - with the centerboard up, the DRAFT of the Flying Scot is only 8 inches. With the centerboard fully down draft is 4 feet.
-
FREEBOARD is the exposed area of the hull that is above the waterline. The larger the freeboard area the more the sailboats bow tends to be blown downwind. Even if your mainsail is eased out - or even dropped into the lazy jacks - your freeboard will catch the breeze and you will drift downwind. You can reduce your freeboard exposure by turning directly into the breeze. If you ever REALLY need to ***STOP*** remember that you have an anchor!
-
The GOOSENECK is a swiveling connection between mast and boom.
-
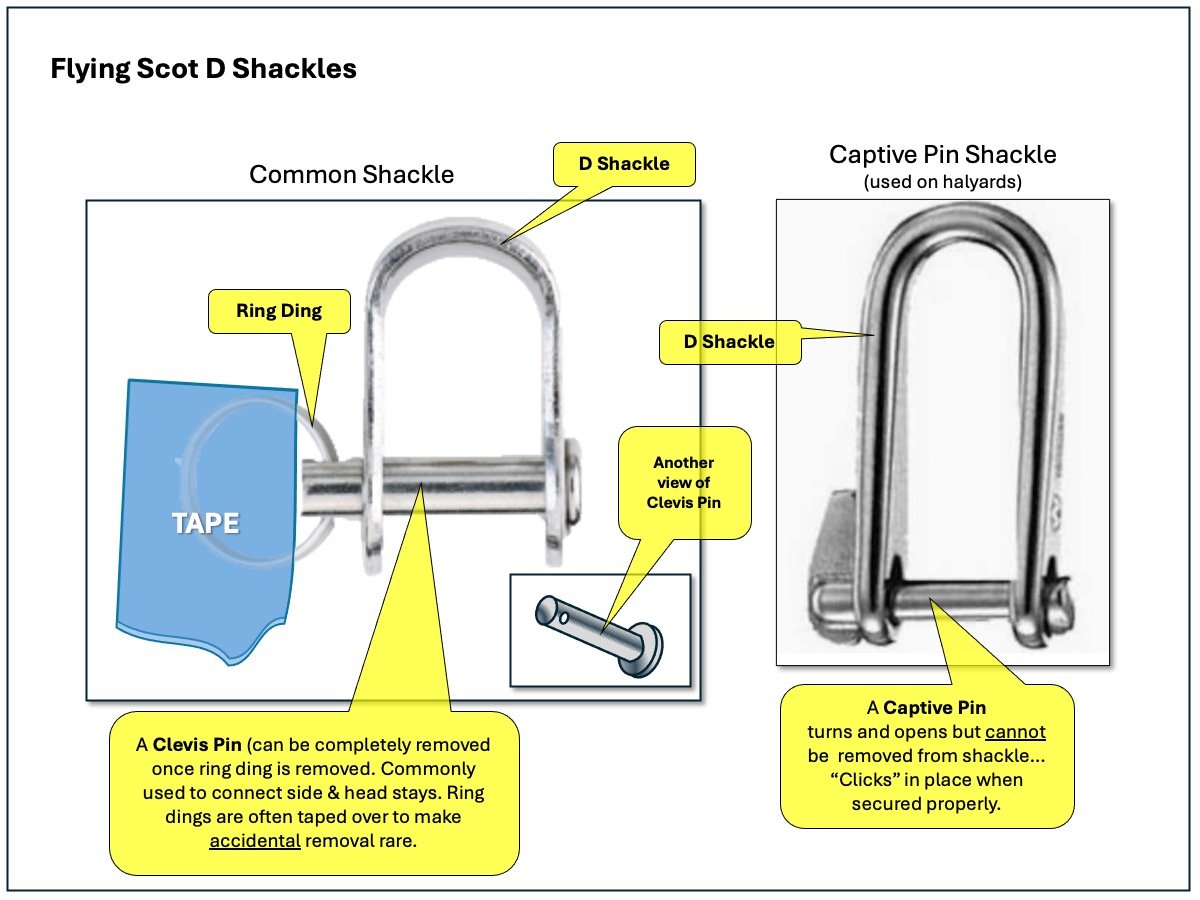
The HEADSTAY - part of the standing rigging - is a stainless steel wire that connects the mast to the deck plate at the bow. The headstay (in conjunction with the side stays (shrouds)) stabilizes the mast and keeps the mast from moving either backward or laterally. The lower end of the headstay on a Flying Scot ends in a two tine fork that connects with a set of adjuster plates on a forestay extender using a clevis pin and a ring ding. The luff edge of the jib sail is connected to the headstay using hanks.
-
The HULL is the exterior of the boat below deck level. Some of it is above the waterline (called freeboard) and some below (called draft).
-
The JIB DOWNHAUL is a control line that runs from the cockpit thru a single block at the bow up to the head of the jib. Hauling on this line will pull down the jib - BUT(!) the jib halyard must first be uncleated and eased. The downhaul line on JoySEA Too is green.
-
The Jib HALYARD (red line in this illustration partially hidden behind the jib sail) runs from the cockpit about 3/4s the way up the mast over a block/pulley and is connected to the head of the jib using a shackle with a captive pin. Hauling downward on the jib halyard hoists (raises) the jib sail.
-
The JIB SAIL is the headsail on the Flying Scot. The Flying Scot is a fractional sloop. Sloop? Sloop = 1 mast with two sails - a mainsail and a headsail (jib). Fractional? Fractional means the headstay only goes partially up the mast. In this case about 70%. On the Scot (and many other sailboats) the standard jib is a 100% headsail. That is - it has a foot (bottom edge) that stretches all the way to the mast. There are larger head sails - like a 150% genoa, the foot of which stretches another 50% beyond the mast. Non-furling headsails connect to the headstay along the luff of the sail using hanks (small connecting straps or clips) - and then the sail can be lowered or raised as desired.
On JoySEA Too there is a downhaul line attached near the head of the jib which allows for easily pulling the jib down from the cockpit. The Flying Scot standard jib has a sail area of 52 square feet and features a clear panel near the foot to aid in keeping other marine traffic in sight. When properly utilized the head sail facilitates strong turns across the windline with minimal loss of momentum. Hint: to achieve that when tacking WAIT for the jib to be backwinded before releasing the jib sheet on the old windward side! (Click JIB for more on executing a successful tack...)
HOWEVER - the jib downhaul line must be uncleated and eased simultaneously. Both of these control lines are parts of the running rigging. RUNNING RIGGING are ropes that control sails - and other performance parts like the centerboard. On JoySEA Too the jib halyard is white with red flecks and is cleated to a port side (LEFT (PORT has 4 letters too) when looking forward) bull/horn cleat near the bottom of the mast.
-
The JIB SHEETS (shown in purple here) are connected to the clew of the jib and the sheets (often one long line) run to opposite sides of the mast back to the cockpit. They are used to control the jib sail - pulling it with proper timing [AFTER it is backwinded] from windward to new windward during tacks and gybes. These lines are part of the running rigging.
-
The LAZY JACKS are a web of lines (shown in pink here) that form a nest for the mainsail atop the boom. When the mainsail halyard is uncleated and eased (to reef or entirely lower the mainsail) the mainsail sits atop the boom within this nest which prevents the mainsail from filling the cockpit. Once lowered the flaked (accordion folded) mainsail should be secured with sail ties immediately.
-
Length overall
-
Length on waterline
-
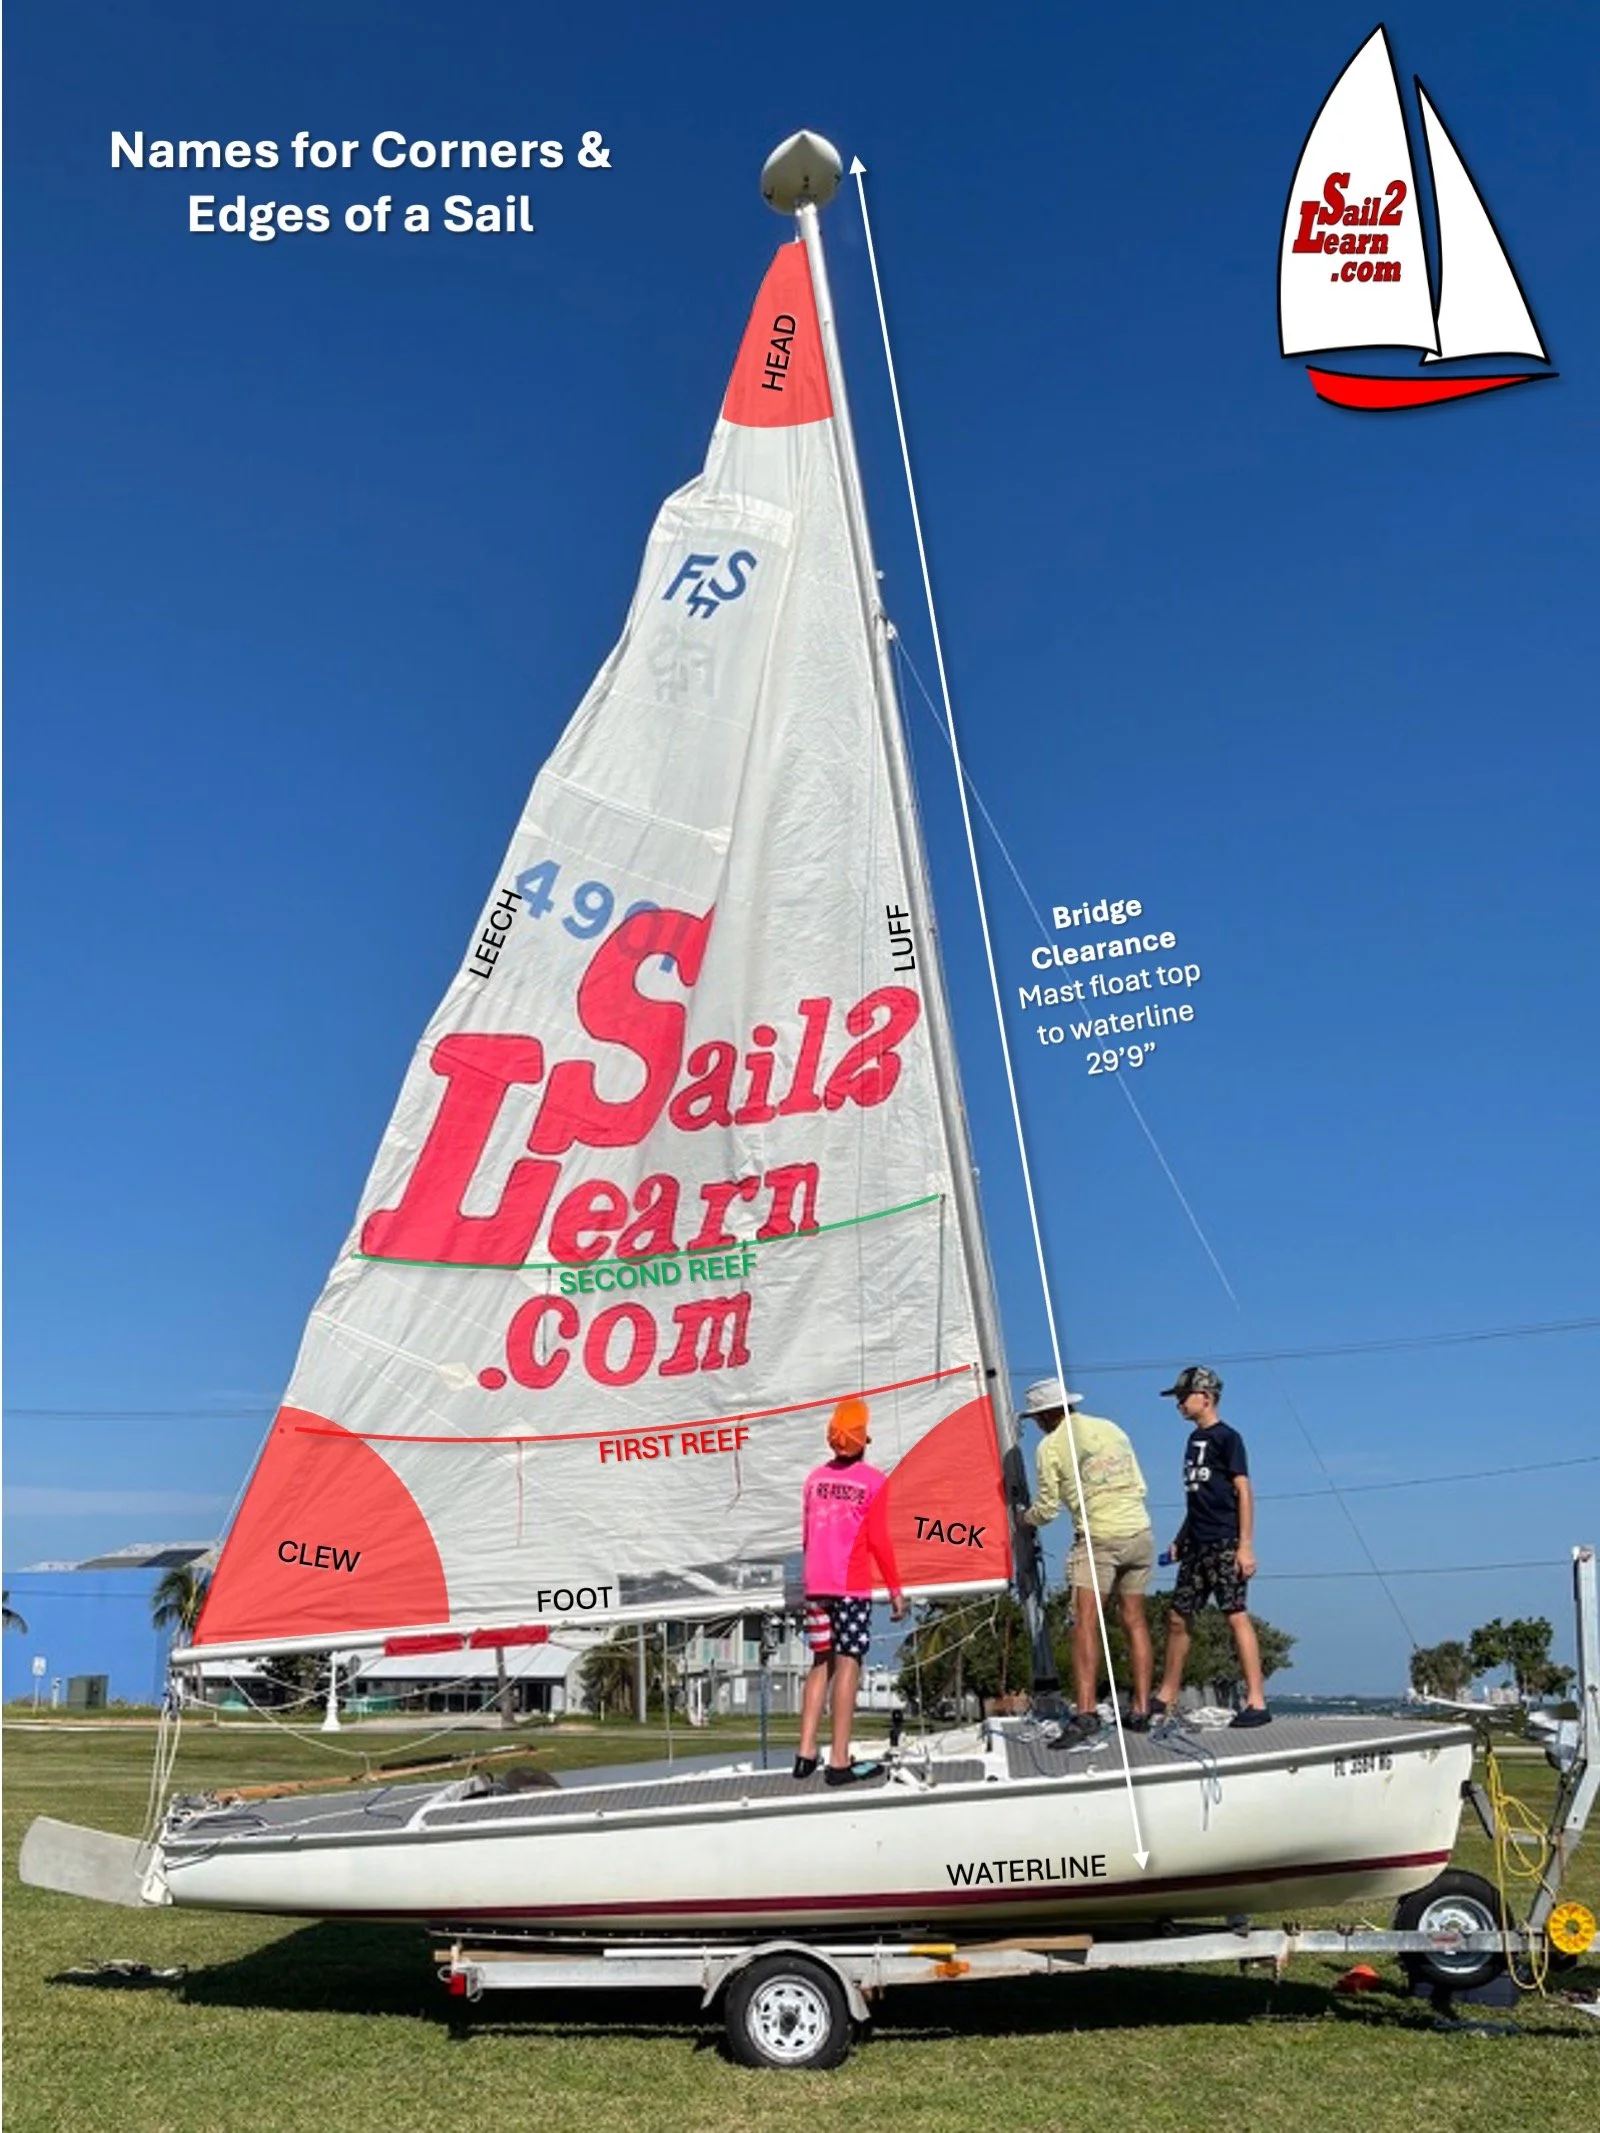
The MAINSAIL is the largest sail (142 square feet) on the Flying Scot. The corners of the sail have names. The top corner is the HEAD. The lower aft corner is the CLEW, and the lower forward corner is the TACK. The corners of the jib (or headsail) have the same names.
-
The mainsail HALYARD (blue line) runs from the cockpit up the mast (often inside) over a block/pulley at the top and is connected to the head of the mainsail using a shackle with a captive pin. Hauling downward on the halyard hoists (raises) the mainsail. This is one piece of the running rigging. RUNNING RIGGING are ropes that control sails and other controls like the centerboard. On JoySEA Too the mainsail halyard is blue in color and cleated to a starboard side (right when looking forward) bull/horn cleat near the bottom of the mast.
-
The MAINSHEET (shown in gold here) is part of the running rigging. It is the rope that runs thru a deck cam-cleat and up to the boom - usually via a double block (pulley) system that provides greater mechanical leverage. When used properly the mainsheet performs much like the accelerator on a car. When sheeting-in (hauling boom in closer to centerline of boat) when the wind is coming across the centerline - the power increases. And when you ease the mainsheet the boat slows (no brakes on a sailboat!).
-
The MAST is the largest spar on the Flying Scot. At 29 feet 9 inches above the waterline (including mast float) it stretches the leading edge of the mainsail vertically by hoisting the head of the mainsail upward via the mainsail halyard. When you plan to sail under a bridge make certain your mast has adequate clearance for the current tidal state. On the right side of the bridge span near the waterline you can see a clearance gauge sign with numerals (descending numbers displayed in feet from waterline upward) indicating distance from the water to the lowest point of the bridge.
On your VHF radio (channel 9 in FL, GA & SC - 13 or 15 elsewhere in the USA) call the bridge master if there is ANY doubt! If you do not have a VHF radio oftentimes nowadays you can phone the bridge. Sometimes they have a phone number posted on the bridge. You can also use a sound signal with an airhorn. One long (4-5 seconds) blast + one short blast makes an opening request. The bridge will respond the same if they can open or five short blasts if they cannot. Some bridges respond on request and some operate on a schedule - 20 or 30 min on the hour.
-
The MAST FLOAT or TURTLE PREVENTER is a hollow solid air chamber that prevents a sailboat from inverting (called turning turtle) - if a capsize were to occur. When a boat turtles the hull inverts and the mast points straight down to the seabed. It is difficult to right a boat when this happens! So a mast float is a great addition to a sailboat’s rig.
NOTE HOWEVER - the average depth of Sarasota Bay is approximately six feet. We will NOT turn turtle on the bay - and a Flying Scot is DIFFICULT to capsize period! AND it absolutely will NOT sink! There are massive blocks of styrofoam floatation fixed under the cockpit seats.
-
The PAINTER is a rope that is tied to the Scots bow handle. It is used to control the bow
during launching and landing. This line is yellow on JoySEA Too.
-
The RUDDER can turn the boat to port or starboard when used properly. The Flying
Scot rudder is a kick-up rudder. That is - if you run into a shallow area the hinged
rudder rotates aft. It take some practice to get used to using the tiller & rudder.
Push the tiller to port and the rudder goes to starboard AND so does the boat(!)
and vice-versa!
NOTE that when the boat is drifting (or motoring) backward the rudder works
exactly the reverse... Point the rudder to the side you desire to move towards.
-
The SHROUDS are steel wires (one port and one starboard (and one head stay as
well that is anchored at the bow) that run from deck up to the upper mast. Along
with the head stay they support the mast.
-
The STERN is the posterior (or aft end) of your boat. Your rudder and tiller are
located at the stern.
-
The TILLER is used for steering. Push to left to turn the bow to the right (starboard)
- push it to right to turn the bow to the left (port). The helmsman usually handles
both the tiller and the mainsheet.
-
The TILLER EXTENSION allows the helmsman to hike out (sit up on the rail) and
still steer via the tiller.
LINK TO IMAGE
-
The TILLER TAMER is a simple auto-helm system that once engaged provides a way
to keep the tiller in place without a helmsman. It is composed of a short (8-12”)
section of bungee cord, a ¼” line, a clam cleat, an eyestrap, an S hook, and a 6-7’
length of ¼” line that is fixed to the aft deck from starboard and port rails.
-
The TOPPING LIFT or BOOM LIFT (shown in gold here) is a line that runs from the
aft portion of the boom to the top of the mast. If the mainsail were to be lowered
(or reefed) and flaked this line would prevent the boom from falling into the
cockpit.